New Items at End of Pivot Table Drop Down Lists

While working in the pivot table source data, you might add new items. For example, if you start selling a new product, that product will appear in the list of orders. If your pivot table is based on that list of orders, the new product will also appear in the pivot table, when you refresh it.

Sometimes the new items appear at the end of the drop down lists, instead of in alphabetical order. In this list you can see that Paper Clips are at the end, but should follow Paper.

ListOrder01

To fix this problem, you can sort the field where the new items appear. In this example the new items are in the Product field, so we’ll sort that field.

Sort the List in Excel 2007

  1. In the pivot table, click the dropdown arrow for Row Labels.
  2. If there are two or more fields in the Row Labels area, click the drop down arrow at the top of the menu, and select the field that you want to sort. (The Select Field drop down doesn’t appear if only one field is in the Row Labels area)
    ListOrderB01
  3. Click on More Sort Options…
    ListOrderB02
  4. In the Sort dialog box, under Sort Options, click Ascending (A to Z), and select the field name from the drop down list.
    ListOrderB03
  5. Click OK, to close the dialog box.

Sort the List in Excel 2003

To fix this problem, you can sort the field where the new items appear. In this example the new items are in the Product field, so we’ll sort that field.

  1. In the pivot table, right-click on any item in the field that you want to sort.
  2. In the pop-up menu that appears, click on Field Settings

    ListOrder02

  3. In the PivotTable Field dialog box, click the Advanced buttonListOrder03
  4. Under AutoSort Options, click AscendingListOrder05
  5. Click OK, to close the dialog boxes.

_____________________


Create a Combination Pivot Chart

After you create a column chart from a pivot table, you might want to change it so the chart is a combination chart type. You’d like most of the series to remain as columns, and one of the series to be a line.

In Excel 2007 there are no Combination Chart types that you can choose, as there were in the Excel 2003 Chart Wizard. However, in any version of Excel you can create your own combination charts.

In this example, the chart is a Clustered Column chart type, with the series showing the sales of each category in each city.

ComboChart01

You’d like to change the Cookies series to a line, so it stands out from the other categories.

In the pivot chart, right-click on one of the Cookies columns.

In the shortcut menu that appears, click Change Series Chart Type

ComboChart02

In the Change Chart Type dialog box, click the Line chart type, and click one of the Line subtypes, then click OK.

ComboChart03

The chart is now a combination chart, with columns for Bars, Crackers and Snacks, and a line for Cookies.

ComboChart04

    ___________________________

    For more information on pivot tables, see the Pivot Table Topics on my Contextures web site.

    ___________________________

Create a List of Pivot Table Formulas

If you’ve used calculated items and calculated fields in your pivot table, you can automatically create a list of all the formulas.

List the Formulas in Excel 2007

  1. Select any cell in the pivot table.
  2. On the Ribbon, under the PivotTable Tools tab, click the Options tab.
  3. In the Tools group, click Formulas
  4. Click  List Formulas.

PivotFormList01

A new sheet is inserted in the workbook, with a list of the calculated fields and a list of the calculated items.

PivotFormList02

List the Formulas in Excel 2003

  1. Select any cell in the pivot table.
  2. On the Pivot toolbar, click PivotTable.
  3. Click Formulas, then click  List Formulas.

PivotFormList03

A new sheet is inserted in the workbook, with a list of the calculated fields and calculated items (see the Excel 2007 example above).

    ___________________________

    For more information on pivot tables, see the Pivot Tables on my Contextures web site.

    ___________________________

Filter the Source Data For a Pivot Table

To see the detail behind a number in a pivot table, you can double-click a data cell in the pivot table. This creates a new worksheet, with the related records from the source data. This technique can be helpful when troubleshooting, but you can end up with many extra sheets in your workbook, and you’ll need to delete all the excess sheets.

Continue reading “Filter the Source Data For a Pivot Table”

Counting Blank Cells in Source Data

If there are blank cells in one of the fields in your source data, you might want to show a count of the blank cells in the pivot table.

In this example there’s a Region field in the source data, and some of the records have no region name entered. In the pivot table, you’d like to see a count of how many records are missing a region name.

NOTE: For an updated version of this article, go to Count Blank Entries in Pivot Table
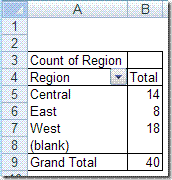
Incorrect Count

To find the count, you might add the Region field to the pivot table’s row area, and put another copy of the Region field in the data area, as Count of Region.This seems logical, but there’s no count showing for the blank regions.

PivotCountBlanks

Video: Count Blank Entries in Pivot Table

[Update] This 3-minute video shows the steps for correctly counting blank items from the source data for a pivot table.

Get the sample Excel file, and written steps, on the Count Blank Cells in Pivot Table page on my Contextures site.
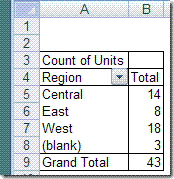
Get Correct Count

A pivot table can’t count the blank cells when you add a field to the data area and use the Count or CountNum summary function. That’s why no count appears beside the (blank) region in the screen shot above.

Instead, put a different field in the data area, and use it for the count.

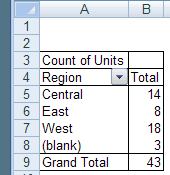
For example, if the Units field will always contain data, add Count of Units to the data area, as shown below.

The count of blank Regions is now calculated, and you can see that three records are missing a region name.

PivotCountBlanksB

Repeat Pivot Table Headings When Printing

If your pivot table spans two or more printed pages, the page, row and column headings might only print on the first page. You can set an option for the pivot table to make the page, row, and column headings appear on every sheet when you print the pivot table. This will make it easier for readers to understand the report, without flipping back to the first page to see the headings.

Before you turn on this option, clear any entries for row and column titles on the worksheet. If either of these boxes contains an entry, the Set print titles option won’t be applied.

  1. On the Excel Worksheet menu, choose File | Page Setup.
  2. On the Sheet tab, under Print titles, clear the Rows to repeat at top and Columns to repeat at left boxes.
  3. Click OK to close the Page Setup dialog box.

Next, you’ll turn on the Print Titles option. Note that only one pivot table per worksheet can have the Set print titles option selected.    

  1. Right-click a cell in the pivot table, and choose Table Options.
  2. Add a checkmark to Set print titles.
  3. Click OK to close the PivotTable Options dialog box.

PTSetPrintTitles[2]

    ___________________________

    For more information on pivot tables, see the Pivot Table Topics on my Contextures web site.

    ___________________________

Show Pivot Table Subtotals at the Top of a Group

In your pivot table, you might like the subtotals to appear at the top of the row field items.

If the pivot table is in outline (Report) layout, you can format the field to control where its subtotals appear:

  1. Double-click the field button to open the PivotTable Field dialog box.
  2. Click the Layout button.
  3. Select Show items in outline form and add a checkmark to Display subtotals at top of group.
  4. Click OK, then click OK to close the PivotTable Field dialog box.

___________________________

For more information on pivot tables, see the Pivot Table Topics on my Contextures web site.

___________________________

Automatically Include New Data in a Pivot Table

If your pivot table is based on Excel data, you probably add new records to that data, on a regular basis. You want the pivot table to automatically include those new records, without you having to manually change the pivot table range every time you add new data.

A range that expands automatically is called a dynamic range, and here are a couple of ways to create one in Excel.

Create a Named Table

In Excel 2010 and 2007, you can format a list as a Named Table, and use that as a dynamic source for your Pivot Table. There are instructions here: Excel Tables — Creating an Excel Table. This is a quick and easy way to create a dynamic range.

Create a Dynamic Range With a Formula

In Excel 2007, and earlier versions, you can use a formula to create a dynamic range, which will automatically expand to include any new rows and columns. Follow these steps to create a dynamic range:

  1. Select the top-left cell in the source table. This step isn’t necessary, but helps you by inserting the cell reference in the name definition.
  2. Choose Insert | Name | Define.
  3. In the Names in workbook box, type a name for the dynamic range, for example, PivotData.
  4. In the Refers to box, type an OFFSET formula that refers to the selected cell. For example, with cell A1 selected on a worksheet named Pivot, you’d type (all on one line)
    =OFFSET(Pivot!$A$1,0,0,
    COUNTA(Pivot!$A:$A),
    COUNTA(Pivot!$1:$1))
  5. Click the OK button.

Change the Pivot Table Source

Then, change the pivot table’s source to the dynamic range that you created:

  1. Right-click a cell in the pivot table.
  2. On the shortcut menu, click PivotTable Wizard.
  3. Click the Back button.
  4. In the Range box, type the name of the dynamic range, and click Finish.

Note

This technique will not work if there are other items in row 1 or column A of the Pivot worksheet. Those items would be included in the count, and would falsely increase the size of the source range.

______________

Locate Source Data For a Pivot Table

You might have to make changes to a workbook that contains a pivot table. If someone else created that workbook, you may not be sure where to find the Excel table that was used as the pivot table’s source data. In some workbooks there can be several Excel tables, and it’s not immediately obvious which table was used. These tips will help you locate the source data for a pivot table.

Continue reading “Locate Source Data For a Pivot Table”