If you plan to build a pivot table, check the source data first, to make sure you have it set up correctly. If there is a heading for each month’s sales, instead of just one column where all the amounts are stored, that won’t work well in a pivot table. You need to “unpivot” your data first, and you can unpivot Excel data with a macro.
Pivot Table Source Data
In the screen shot below, the data almost looks like a pivot table already. It has a separate column for each month’s sales, and a year’s worth of data in each row. The data is set up horizontally, with data going across the worksheet.

if you built a pivot table from that data, there would be a separate field for each month. The pivot table won’t be able to automatically calculate an annual total – you would need a calculated field to add all the month values together.
We don’t want the data set up like a pivot table – we need to “unpivot” it. Ideally, you should set up the data vertically, with data going down the worksheet.
So, in this example, all the months should be in one column, and all the sales amounts in another column.

UnPivot Excel Data Manually
If you have a simple data set, you can manually upivot the data, and there are instructions here. That technique creates a Multiple Consolidation Range pivot table, then uses its Show Details feature to “unpivot” the data.

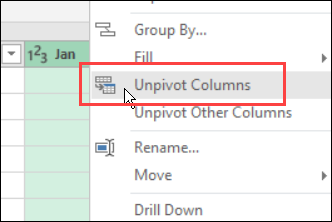
UnPivot With Get & Transform
In newer versions of Excel, you can use the Get & Transform tools to unpivot Excel data. There are instructions on my Contextures blog.
UnPivot Excel Data With a Macro
Since most data has more than one or two label fields, a macro will make the job much quicker. You can download my sample file below, which contains a macro that will unpivot Excel data for you, as long as the data meets a couple of minimum requirements:
- First, set up the data as a named Excel table
- Then, put the description columns at the left, and value fields at the right.
- Finally, check the values. The macro puts all the value fields into one common field, so don’t use this macro if there are different types of values in the data, such as sales dollars, and unit counts.
Original Data Not Changed
This macro will leave your original data unchanged. It creates a new workbook with an unpivotted data set that you can copy to another location.
NOTE: You should replace the old data with the new data, moving forward. The two data sets are not connected, and if you update one, it will not automatically update the other.
You can read more about the macro on my Contextures website – Macro to Unpivot Your Excel Data
Download the Sample File
To Unpivot Excel Data with a macro, you can download the sample file from my Contextures website. Then, on that page, scroll down to the Download Sample File section, and you’ll see the link for the sample file.
The zipped file is in xlsm format, and be sure to enable macros when you open the file. It has a table with data that you can use for your test.
_______________
Hi,
I am trying to use your macro, but while it runs seemingly correctly there is no new workbook opening nor saving to my drive as far as I can tell
Any suggestions?
I am using a Mac, could this be the issue?
Regards
Ben
Same here
Hello! thank you for this as this might be very useful.
but what i need to do is have a fixed number of Columns and value of Separator that is being asked during the macro (i.e., no input box will appear).
can you also provide a sample that does that please? Thank you so much in advance!