Copy Pivot Table Values and Formats

If you create a pivot table in Excel 2007 and later versions, formatting is automatically applied by the PivotTable Styles feature.

PivotStyles01

This feature makes it quick and easy to format your pivot tables, and helps you stay consistent with the Theme settings in your Excel file.

Problems with Format Copying

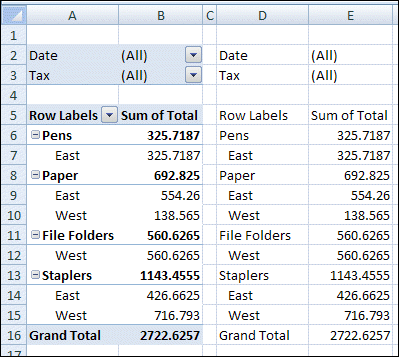
Occasionally, you might want to copy a pivot table as values, without the underlying data. Unfortunately, if you copy an Excel 2007 or later pivot table, and paste it with the Paste Special command, the PivotStyle formatting is not pasted.

In the screenshot below, the values from the pivot table were pasted into columns D:E, but pasting the formats had no effect.

pivotcopyformat

Pivot Table Format Paste Workarounds

Fortunately, there are workarounds for the problem of pasting the pivot table formatting:

  1. Use the Office Clipboard, to paste the Pivot Table formatting
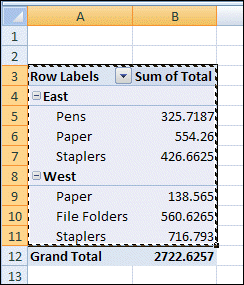
  2. Copy and paste the pivot table in a couple of steps, as shown below
  3. Programmatically copy the pivot table in a couple of steps

pivotbodycopy02 

___________

Problems With Pivot Table Comments

In some pivot tables, you might want to add comments to a few cells, to help the users understand what the results mean, or to explain the different pivot fields. However, if you add comments to a pivot table, you’ll run into a couple of problems.

Add a Comment to the Pivot Table

The Insert Comment command doesn’t appear in the popup menu if you right-click on a pivot table cell.

To insert a comment in a pivot table:

  1. Select the cell where you want the comment.
  2. On the Excel Ribbon, click the Review tab
  3. Click New Comment

Tooltips Block the Comments

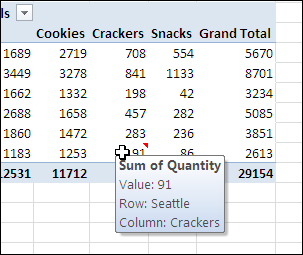
One problem with comments in a pivot table is that the contextual tooltips might appear when you point to a pivot table cell that contains a comment. In the screen shot below, you can see the red comment marker, but the comment isn’t visible.
Comments01

If you decide to use comments, follow these steps, to turn off the tooltips feature.

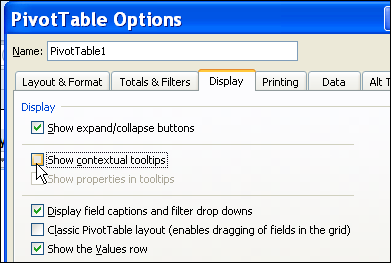
  1. Right-click a cell in the pivot table, and then click PivotTable options.
  2. In the PivotTable Options dialog box, on the Display tab, remove the check mark from Show contextual tooltips and then click OK.
Comments02

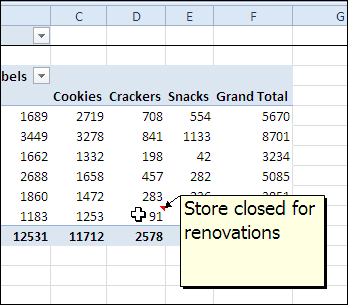
After you turn off this setting, the comment appears when you point to the cell.
Comments03

Pivot Table Comments Don’t Move

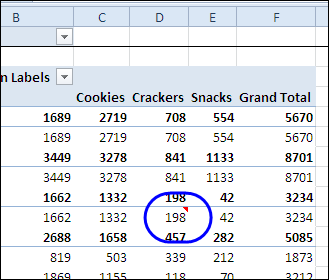
When you add comments to cells in the pivot table, the comments are attached to the Excel worksheet cell, rather than to the pivot item’s cell. If you change the pivot table layout, the comments won’t move with the item, and the comments could end up confusing the users instead of helping them.

In the screen shot below, a new field has been added to the row area. The comment was originally added to cell D10, that had a value of 91, for cracker sales in Seattle. Now the layout has changed, but the comment is still in cell D10. That cell now has a value of 198, and summarizes cracker sales at store 3074 in Detroit.
Comments04

Alternative to Comments

Instead of inserting comments in the pivot table, you could add a column to the source data, and enter brief comments there. A user who has a question about the data in the pivot table could double-click on the cell, using the Show Details feature to extract the source data and read any notes entered.

___________
Create a Custom PivotTable Style

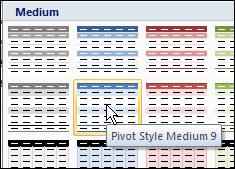
There are many built-in PivotTable styles in Excel 2007, but you might not see one that has the exact formatting you need. For example, you might like the heading colors in the Pivot Style Medium 9, but you’d like a different color in the subtotal row.

pivotcustomstyle

Instead of using one of the built-in PivotTable styles, you can create a custom PivotTable style with the formatting you prefer. You can either duplicate an existing Pivot Table style, and modify the duplicate, or you can create a new style from scratch.

Copy an Existing PivotTable Style

If you find a PivotTable style that’s close to what you need, you can duplicate that style, and modify the duplicate. Follow these steps to create a custom style, based on an existing style:

  1. Select a cell in the pivot table, and on the Ribbon, click the Design tab.
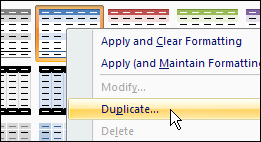
  2. In the PivotTable Styles gallery, right-click the style you want to duplicate.
  3. In the context menu, click Duplicate.

pivotcustomstyle02

Next, follow the steps in the Modify the PivotTable Style section (below), to name and modify the new style.

Create a New PivotTable Style From Scratch

If you don’t see anything similar to what you need, you can create a new style from scratch. Follow these steps to create a new style.

  1. Select a cell in the pivot table, and on the Ribbon, click the Design tab.
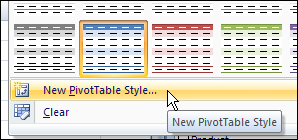
  2. In the PivotTable Styles gallery, click New PivotTable Style (at the bottom of the PivotTable Styles gallery)

pivotcustomstyle03

Next, follow the steps in the Modify the PivotTable Style section (below), to name and modify the new style.

Modify the PivotTable Style

After duplicating or creating a PivotTable style, follow these steps to name the style and set the formatting.

  1. In the Modify PivotTable Quick Style dialog box, type a name for the new PivotTable style. (If you created a new style, the dialog box will be named New PivotTable Quick Style.)
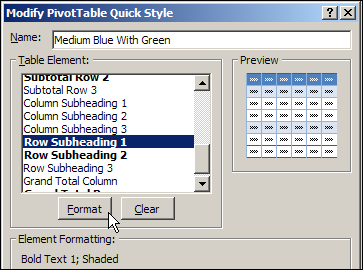
  2. To modify an element’s formatting, click it to select it, and then click the Format button. (Note: In the Table Element list, the elements in bold font have formatting applied. You can modify or clear that formatting. You can also select unformatted elements and format them.)pivotcustomstyle04
  3. In the Format Cells dialog box, select the Font, Border, and Fill settings you want for the selected element.
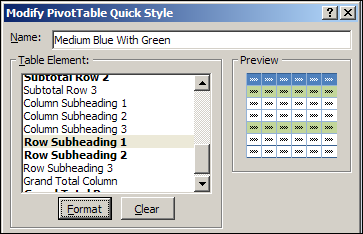
  4. Click OK, to return to the New PivotTable Quick Style dialog box, where the formatted element is listed with a bold font. In the screenshot below, you can see the revised color in the Preview section.pivotcustomstyle05
  5. Repeat Steps 2 to 4, for any other elements that you want to format.
  6. (optional) If you want your custom style to be the default PivotTable style, add a check mark to Set As Default PivotTable Quick Style For This Document.pivotcustomstyle06
  7. Click OK, to close the New PivotTable Quick Style dialog box.

Apply the Custom PivotTable Style

The new PivotTable style that you created will not be automatically applied to the active pivot table. Follow these steps to apply your custom style.

  1. Select a cell in the pivot table that you want to format.
  2. Open the PivotTable Styles gallery.
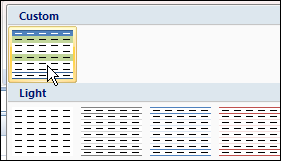
  3. The custom PivotTable Style you created is added to a Custom section at the top of the PivotTable Styles gallery.
  4. Click your custom style, to apply it to the active pivot table.

pivotcustomstyle07

__________

Remove a Pivot Table Style in Excel 2007

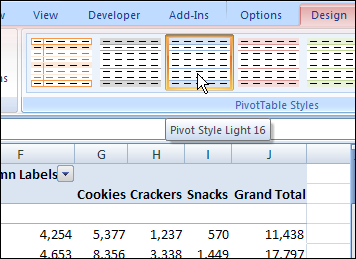
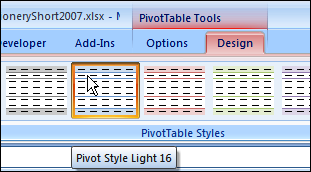
When you create a pivot table in Excel 2007, a default PivotTable style is automatically applied to a pivot table. For example, in the screen shot below, the pivot table uses the Pivot Style Light 16.

Pivot Style Light 16

Remove the Pivot Table Style

In some workbooks, you might prefer to have a pivot table with no fill color or header formatting.  In the PivotTable Styles gallery, you can apply a special style to remove the existing style.

Follow these steps to clear the PivotTable style:

  1. Select a cell in the pivot table.
  2. On the Ribbon, click the Design tab.
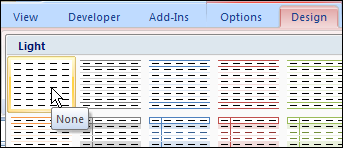
  3. In the PivotTable Styles gallery, click the first style, None, at the top left of the Light styles.

Pivot Style None

Pivot Table Style Removed

After you click the None option, the existing style is removed, and a thin border remains around the pivot table sections. The worksheet gridlines, if displayed, are not visible within the pivot table.

Also, when no PivotTable style is applied, the preview function does not work if you point to a different style in the PivotTable Styles gallery.

Clear the Pivot Table Style

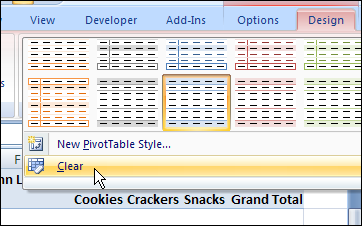
Another way to remove the PivotTable style is to click Clear, at the bottom left of the PivotTable Styles gallery.

Pivot Style Clear

______________
For more information on Pivot Tables, please see the Pivot Table Tutorials on the Contextures Website.

______________
Keep Formatting in Excel 2007 Pivot Table

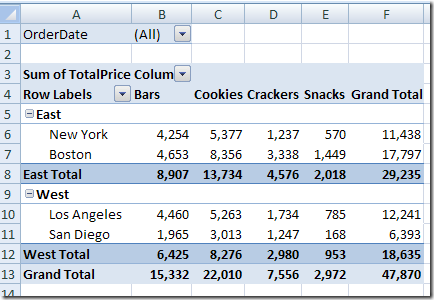
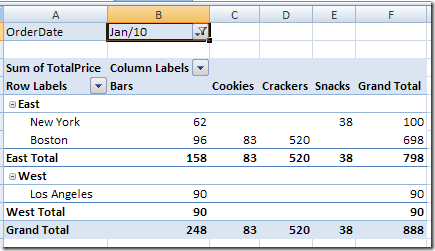
Even though a pivot table is automatically formatted when you create it, you can add your own formatting later. For example, in the pivot table shown below, I’ve added colour to the subtotal rows, and made column B narrow.

PivotFormat01

However, some of that pivot table formatting might be lost if you refresh the pivot table or change its layout. Even if you select a different item in the report filter, the formatting could be lost.

Here’s what the same pivot table looks like, after I select an order date from the report filter.

PivotFormat02

Preserve the Formatting

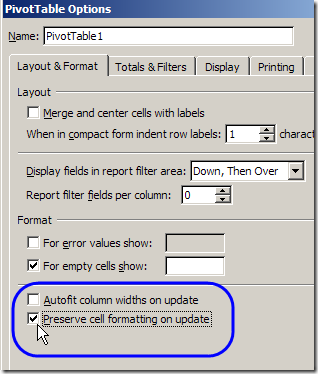
Most pivot table formatting can be preserved if you change the Format options in the PivotTable Options dialog box.

  1. Right-click a cell in the pivot table, and click PivotTable Options.
  2. On the Layout & Format tab, in the Format options, remove the check mark from Autofit Column Widths On Update. This will prevent column widths from changing, if you have manually adjusted them.
  3. Add a check mark to Preserve Cell Formatting on Update
  4. Click OK.

PivotFormat03

Apply Formatting

After changing these Pivot Table options, the formatting should stick. When you apply formatting to the Pivot Table, do the following:

  1. Ensure that Enable Selection is turned on.
  2. Unless you want to format a single cell, use the pivot table selection technique to select the elements you want to format (point to the top or left edge of the element, and then click when the black arrow appears).

______________
P.S. For more information on Pivot Tables, please see the Pivot Table Tutorials on the Contextures Website.

_________________
Starting Each Pivot Item on a New Page

Normally, a long pivot table prints to the bottom of a page, then continues on the next page. The page break occurs naturally, not at a specific position in the pivot table.

You can control the page breaks, by changing the pivot table settings.

The Sample Layout

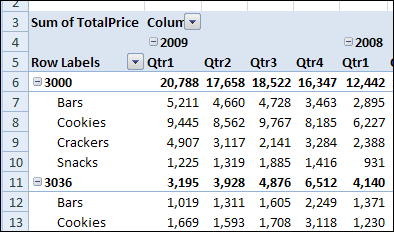
In this example, the pivot table has two fields in the Row Labels area – Store and Product Category.

pivotitempage01

We’d like to print this pivot table, with each store’s data starting on a new page. That way, we’d be able to print the entire
report, and send each store its own section.

Change the Field Setting

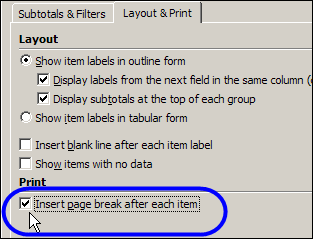
We’ll change a setting in the Store field, so each pivot item starts on a new page in the printed report.

  1. Right-click one of the Store labels in the pivot table, and then click Field Settings.
  2. In the Field Settings dialog box, on the Layout & Print tab, add a check mark to Insert Page Break After Each Item.
  3. Click OK, to close the dialog box.

PivotItemPage02

Things to Consider

The Insert Page Break After Each Item setting doesn’t force all items for a field fit on one page. It only creates a page break so the next item will start on a new page. If a field has many items, it might print on two or more pages.

Also, with this setting, your printed report could use an excessive amount of paper. You might prefer to manually adjust the page breaks in Page Break Preview.

To Go To Page Break Preview

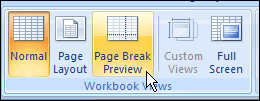
  1. On the Ribbon’s View tab, in the Workbook Views group, click Page Break Preview.

    RibbonPageBreak

  2. Dashed lines indicate an automatic page break and solid lines are manual page breaks.
  3. To move a page break, point to it, and drag up or down on the page.

To return to Normal view

  1. On the Ribbon’s View tab, in the Workbook Views group, click Page Break Preview.

_____________
Show Text in a Pivot Table Values Area

A common question is “How can I show text in a pivot table’s values area, instead of numbers?”

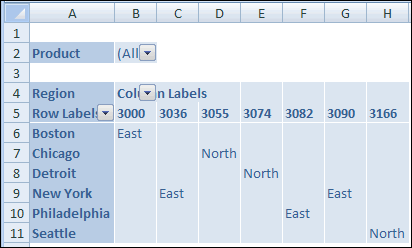
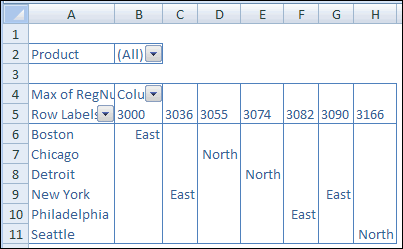
For example, if you add the Region field to the Values area, you’d like to see the region’s name, instead of a Count Of Region number.

PivotTextVal01

If you use Crosstab queries in Microsoft Access, you might have achieved this by using the First or Last summary function, instead of Sum or Count.

Unfortunately, the First and Last functions aren’t available in Excel pivot tables, so there’s no easy way to show text in the Values area.

Workaround #1 – Use the Row Fields

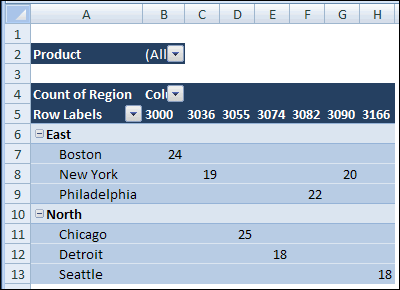
You could add the Region field to the Row Labels area, with the City field. Then add another field in the Values area to show a count of the regions. The layout won’t be exactly what you wanted, but it will show the region name.

PivotTextVal02

Workaround #2 – Create a Custom Number Format

In this example, there are only two region names, so you could use a custom number format to show the region names. You’ll assign a number to each region, then use that number in the pivot table. Note: This technique is limited to 2 items.

Create the Region Number field:

  1. In the source data, add a new column with the heading RegNum. In this column, type a 1 for East region orders and 2 for North region orders.
  2. Refresh the pivot table, so the RegNum appears in the Field List.
  3. Add the RegNum field to the Values area, and right-click on one of the numbers.
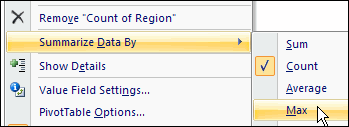
  4. In the popup menu, click summarize by Max.

PivotTextVal03

Apply a Custom Number Format:

  1. Right-click a Region value in the Values area in the pivot table.
  2. In the popup menu, click Number Format.
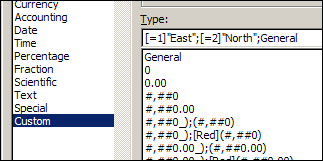
  3. In the Category list, click Custom.
  4. In the Type box, enter [=1]”East”;[=2]”North”;General
  5. Click OK, to close the dialog box.

PivotTextVal04

The pivot table will show the Region names, instead of the Region numbers.

PivotTextVal05

____________
Centre Column Headings in Excel Pivot Table

If your pivot table has column labels, and more than one field in the Values area, you might want to centre the column labels.

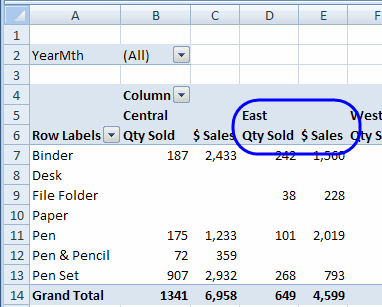
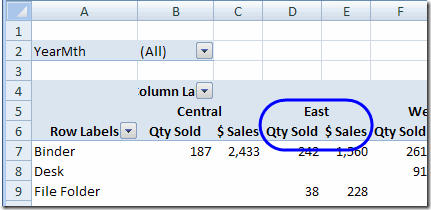
For example, in the pivot table shown below, there are Region headings in the Column Labels area. Below each Region label, there are headings for the Qty Sold and $ Sales fields.

LabelColCtr01

The East label is at the far left of its Qty Sold heading. It’s hard to tell which Region headings go with which Value headings.

To make the pivot table easier to read, you can centre the Region labels over their Value field headings.

To centre the column headings in Excel 2007:

  1. Select a cell in the pivot table
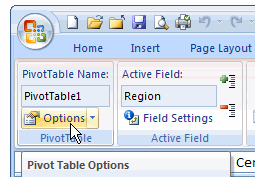
  2. On the Ribbon, under the PivotTable Tools tab, click Options
  3. At the far left, in the PivotTable group, click Options

RibbonPTOptions

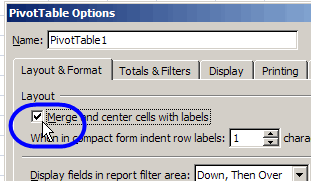
  1. On the Layout & Format tab, in the Layout section, add a check mark to Merge and Center Cells With Labels

LabelColCtr02

  1. Click OK

Each Region column label is now centred over its Value field headings.

LabelColCtr03


Rename a Pivot Table Data Field

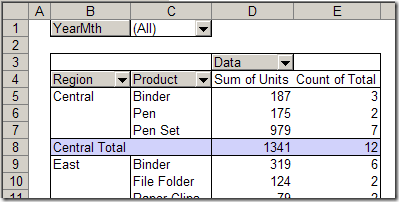
When you add a field to the pivot table Data area, it automatically gets a custom name, such as Sum of Units or Count of Units. You can rename a pivot table data field, either manually or with a macro.

PivotDataNames01

Instead of “Sum of Units”, you might want the name to show as “Units”, so it’s easier to read and the column is narrower.

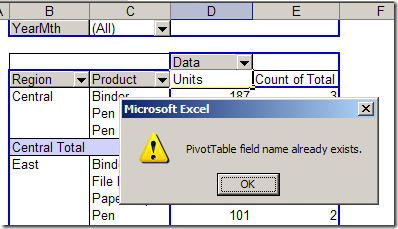
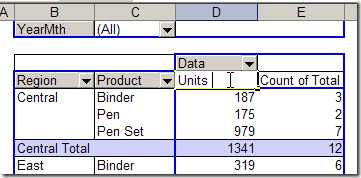
Unfortunately, if you select the cell and type Units, you’ll see an error message: “PivotTable field name already exists.”

rename a pivot table data field

When you try to use a custom name that’s identical to a field name in the source data, you’ll see that error message. In this example, one of the fields in the source data is named Units, so you can’t use Units as a custom name in the pivot table.

Use a Slightly Different Custom Name

To avoid this problem, you can add a space character to the end of the custom name, and it will be accepted.

In the screen shot below, I’ve added a space after typing Units. When I press the Enter key, the name will be accepted, without an error message.

PivotDataNames03

Use a Macro to Rename a Pivot Table Data Field

If you have lots of Data field names to change you could use a macro, to make the job easier. For example, the following macro will change all the Data field captions in the first pivot table on the active sheet.

Sub ChangeCaptions()
Dim pf As PivotField
Dim pt As PivotTable
Set pt = ActiveSheet.PivotTables(1)
For Each pf In pt.DataFields
    pf.Caption = pf.SourceName & " "
Next pf
End Sub

There are instructions here for adding code to your workbook, and running it. This code would go onto a regular module.

There are more code samples on my Contextures website, for changing headings in:

  • all pivot tables on the active worksheet
  • all pivot tables in the active workbook.

___________________________
Copy a Custom PivotTable Style

You can create custom PivotTable Styles in an Excel 2007 workbook, to fine tune the appearance of your pivot tables. If you’ve invested a lot of time in create a custom style, you might like to copy that style to a different workbook.

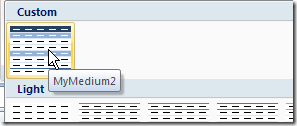
PivotCustomStyleMed

Unfortunately, there isn’t a built-in command that will let you copy PivotTable Styles from one workbook to another. However, you can follow a few simple steps to copy your styles to any workbook.

Copy a PivotTable Style

To copy a custom PivotTable style, you can temporarily copy a formatted pivot table to a different workbook. In this example, we’ll copy a custom PivotTable Style – MyMedium2 – from the MyOld.xlsx workbook to the MyNew.xlsx workbook.

  1. In the MyOld.xlsx workbook, select a cell in the pivot table that has the custom style applied.
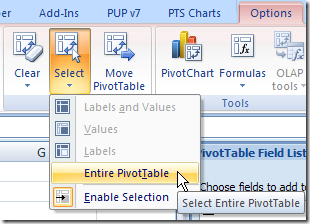
  2. On the Ribbon’s Options tab, in the Actions group, click Select.PivotTableSelect
  3. Click the Entire Pivot Table command.
  4. On the Ribbon’s Home tab, click Copy.
  5. Switch to the MyNew.xlsx workbook.
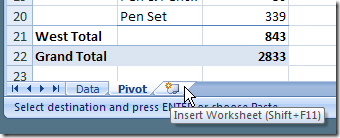
  6. Select a blank worksheet, or insert a new blank worksheet.SheetInsert
  7. Select cell A1 on the blank worksheet.
  8. On the Ribbon’s Home tab, click Paste.
  9. Delete the sheet that contains the pasted copy of the pivot table.

Your custom PivotTable style now appears in the PivotTable Styles gallery.

PivotCustomStyle

Select any pivot table in the workbook, and apply your custom PivotTable Style.

Watch the Video

_____________________
For more information on Pivot Tables, please visit Pivot Table Topics index on the Contextures Website.

_____________________